

This month’s project was a long time coming and one that I am very excited about – installing a water source at the yurt!
If you’ve read my previous posts, you know that for the last year we’ve been hauling our water from the tap in the shop next door. It’s not been the end of the world, but it is definitely inconvenient when you suddenly realize you’ve run out of water and the baby is crying and it’s raining outside and your hands are covered in bacon grease… ask me how I know.
Looking at Our Options
Drilling a professional well on our property would not only be cost prohibitive, but if we were ever to do that we’d want to do it by our final cabin site, which we’re not settled on yet. Rainwater collection isn’t an easy option in a yurt since there aren’t any gutters. Our creek isn’t very deep in the winter and gets down to just a trickle in the summer, so that’s not a good option for a consistent water source.
Which left us with the idea of hand-digging a shallow well.
Over the last two years we’ve observed our land and discovered that water shows up just about everywhere. In the rainy season (aka nine months out of the year around here) it seems like any place you dig, you’ll run into water just under the surface. I dug a hole behind the yurt last spring (2022) and it filled with water in minutes and stayed full all summer!
We also found water trickling out of the side of our cliff down by the river in multiple places, but we were concerned it might just be run-off and dry up during the summer. Last year was particularly wet – it rained well into July – so we were cautious that it might’ve been a fluke year and the ground was just soaked and taking a long time to drain since we have so much clay in our soil.
But this year it didn’t rain at all in May, we only had one week of rain in June, and it’s been dry ever since, so we figured now would be a good testing point to see how far we’d have to dig to find consistent groundwater in the summer.
So how do you dig an off grid well by hand? We used the simplest method: grab a couple shovels and a pickax and get to work!
Finding a Site to Dig Our Off-Grid Well

We weren’t exactly scientific in how we chose our dig sites. We figured there was so much water around, anywhere would work, right? Well, on our first hole we dug for several hours and got about five feet down before we hit an impenetrable layer of hard clay that almost looked like slate, and there was no sign of water. That was a bit disheartening. We might’ve been able to dig further with power tools, but we wanted to try to do it all by hand, so we decided to switch sites.

We tried again a little further downhill where we know it gets really wet in the winter, and within minutes there was water trickling into the hole from the sides. After digging down about two and a half feet, we hit that same layer of rocky stuff – but this time there was a tiny crack in it and water was seeping up from below! What luck!
We lined our hole with a hollowed-out tree trunk that we burned on the inside to help with waterproofing, then we filled in around it and ran a pipe to a hand pump that we installed near the back door. We primed it and pumped the handle a few times… and glorious water poured forth!

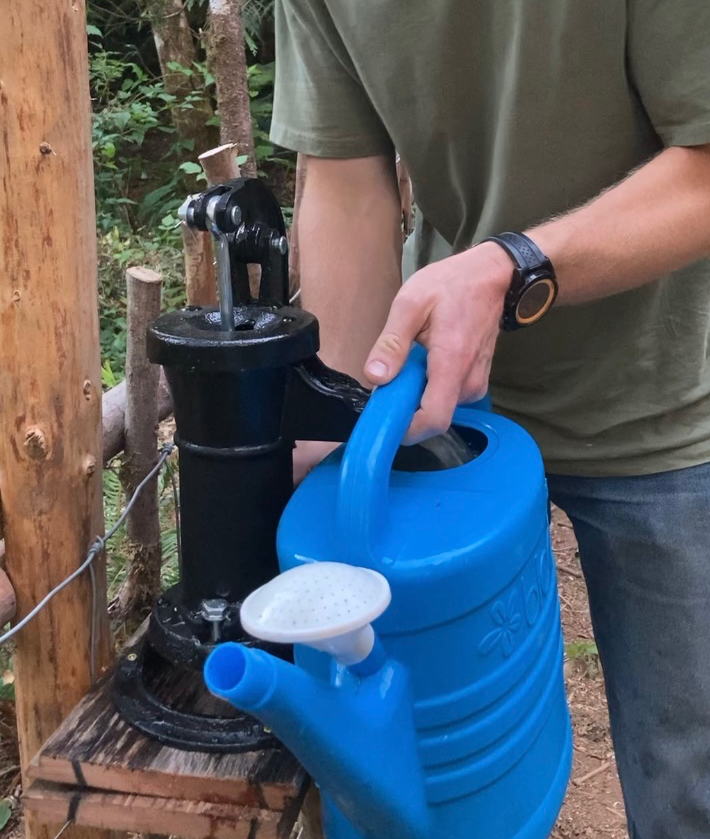
We pumped it until it was dry and got about seven gallons of water! Not bad for a two-foot hole in the ground. The crack that the water comes up through isn’t very big, so it takes quite a while to refill, but we figure we only go through a max of five or six gallons of water on a normal day, so in theory it should suit our needs just fine for now. Obviously it would be nice if it were deeper, and we could’ve tried again in another spot while hoping not to hit rock, but we’ve got other important projects to get to and basically we’re impatient and this is better than nothing lol.

Shallow Well Filtration Ideas
We’ve pumped the well dry a few more times trying to cycle out the water, but it’s still a little murky, so we’ll probably try to rig up some kind of DIY basic filter to run the water through if we’re going to be using it for washing dishes or bathing. Our ProOne water filter can be used with just about any water source including tap, lake, stream, river, pond and rain water, according to their website, so in theory it should clean water straight from the well enough for drinking, but the ProOne filters will last longer if we run it through a basic pre-filter first to get the bulk of the particulate out. We also might try adding some gravel to the bottom of the well to see if that keeps the clay settled. But for now it’s great for watering the dogs and the plants near the yurt, doing a pre-rinse on the dishes (which saves on how much clean water I have to haul from the shop), and rinsing off muddy kids outside!
Conclusion? Success!
All in all, I’m happy with the end result. We’ve already been able to cut down on our water trips to the shop, and I’m excited to build a pre-filter so we can use this source even more. Obviously there are still a few bugs to work out of the system, but we can now pump a handle and having running water right outside our door!
If you’ve ever hand-dug a well or know someone who has, tell me about it in the comments! Plus, any tips your might have for what we can improve next time would be well appreciated!
lol *well* appreciated… get it? 😂

Leave a comment